How to win at Klondike Solitaire
The best Klondike Solitaire strategy is to make the moves that turn over face-down cards, starting with the column that hides the most, and to hold back any move that doesn’t free a card. Here’s one real deal from our Klondike game, played move by move, so you can see each habit at work.
We played it in Turn 1, the way our game starts. Columns are numbered 1 to 7 from left to right. Gold rings in the pictures show the card that’s about to move and where it’s going.
What does the deal look like?
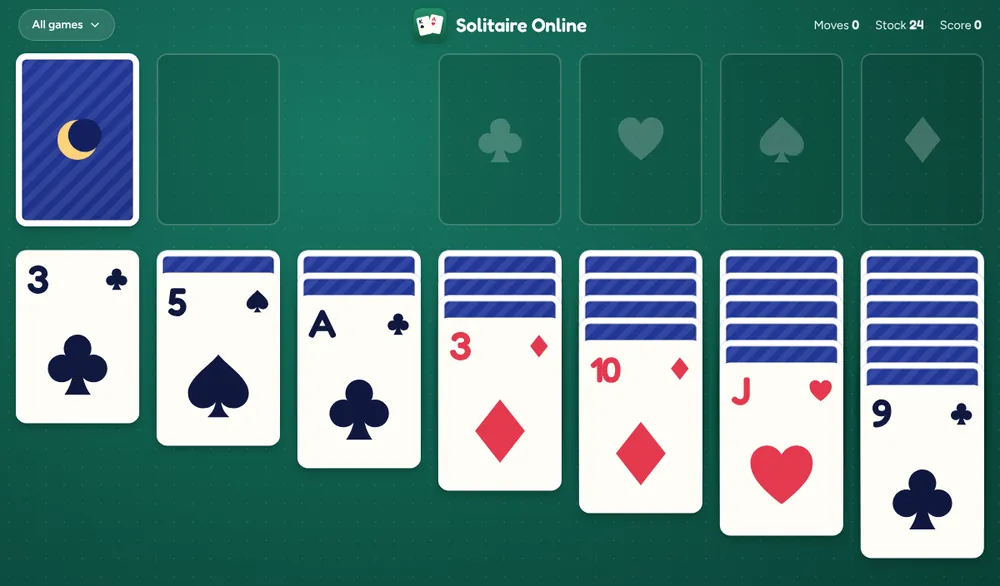
The face-up cards are 3♣, 5♠, A♣, 3♦, 10♦, J♥ and 9♣. Column 7 hides six face-down cards, column 6 hides five, and so on down to column 1, which hides none.
Before touching the stock, look for anything you can do with the cards you can see. There’s quite a lot here.
What should you play first?
The A♣ goes straight to a foundation. An Ace is never useful in a column, because nothing can be built on it there. Moving it turns over a 4♠ in column 3.
Next, find a move that helps column 7, the deepest one. The 9♣ fits on the red 10♦ in column 5.
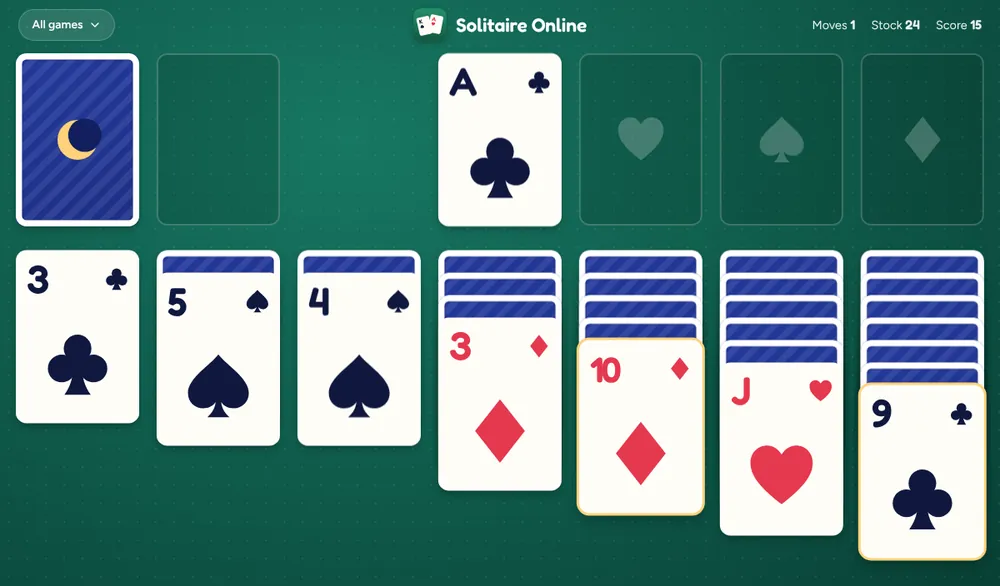
That turns over a 4♥, which goes on the 5♠ in column 2 and turns over a Q♣. The J♥ from column 6 fits on that queen, and underneath it is the A♠, which goes up too. That turns over an 8♠. Then the 3♦ goes on the 4♠, uncovering a K♦, and the Q♣ and J♥ move together onto that King.
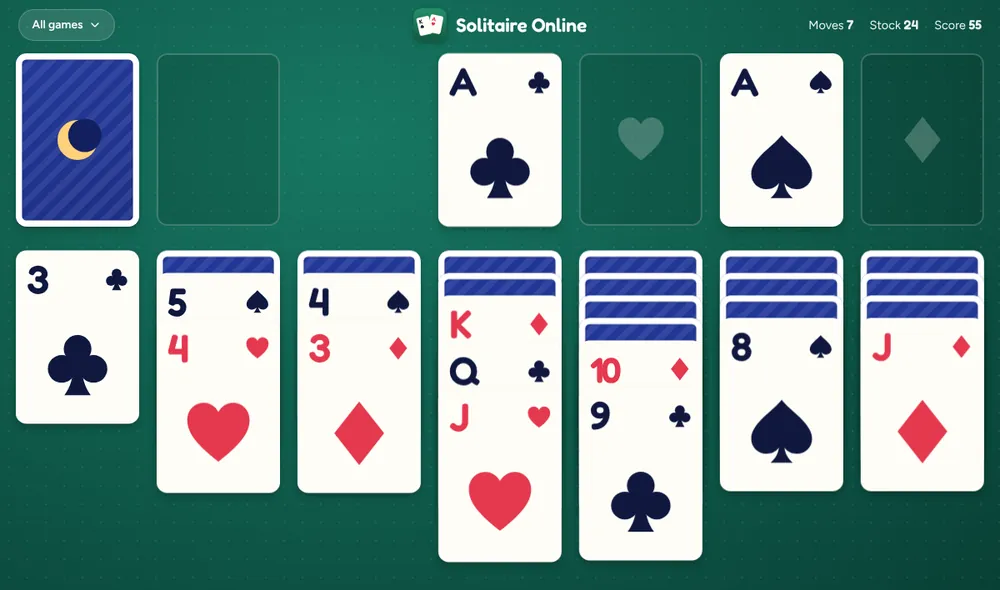
Seven moves, and every one of them turned over a card. The score is already 55, and we haven’t turned a single card from the stock. That’s the first habit: the face-down cards in the columns matter far more than the stock.
When should you turn the stock?
When the columns have nothing useful left to do. Here that came after move 7, so we started turning the stock one card at a time.
The rule while you do it: every card that comes up, ask whether it fits somewhere useful. If it doesn’t, keep turning. In Turn 1 you’ll see it again on the next pass.
Should every card go to the foundations straight away?
No. Aces and 2s, yes. Higher cards only once nothing still needs them.
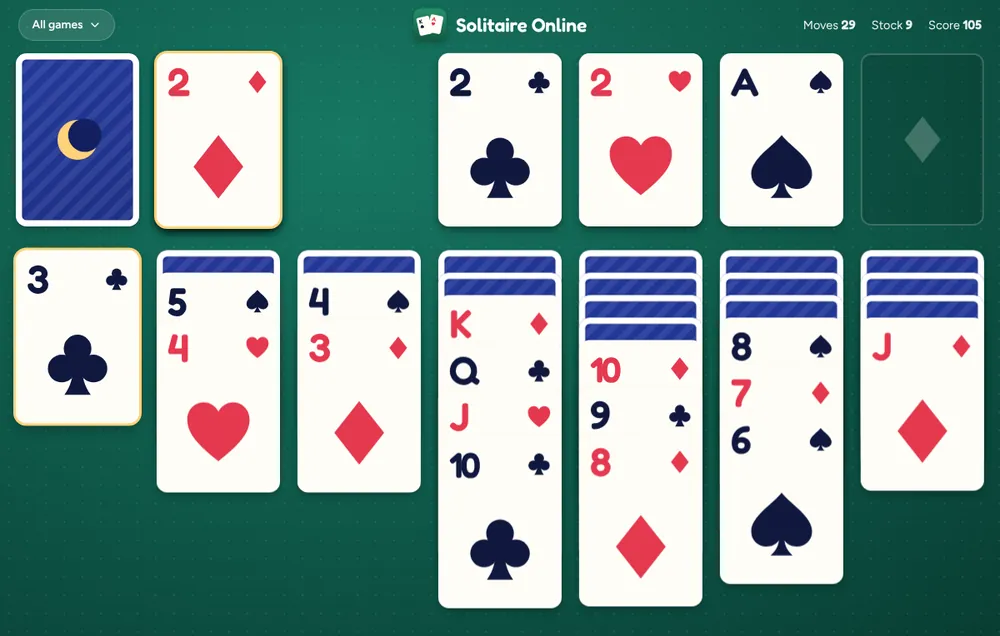
By move 18 the 2♣ was on its foundation, so the 3♣ in column 1 could have gone up too. We kept it down. Then the 2♦ came up from the stock, and the A♦ wasn’t out yet. With the 3♣ still in column 1, the 2♦ had somewhere to sit. When the A♦ appeared, both diamonds went up together.
A low card is only safe to send up once the cards that could build on it are home or nearly home.
When is it safe to empty a column?
When a King is ready to fill it.
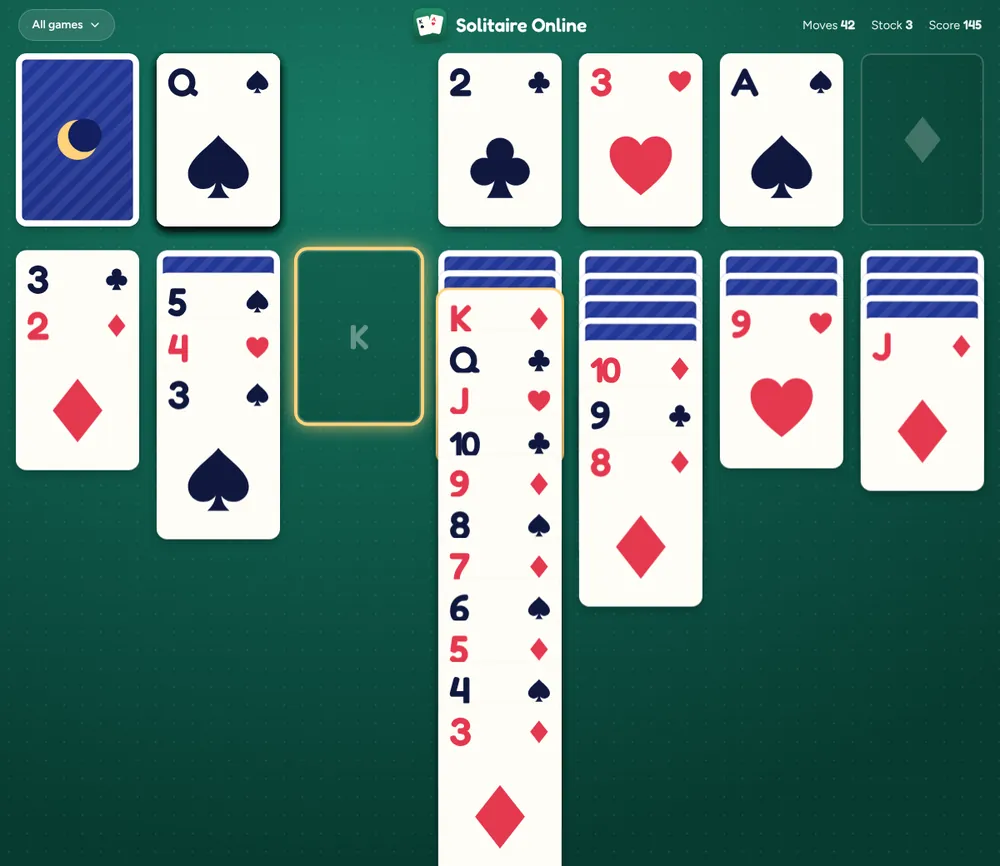
Column 3 held a single 3♥, which could go up on the 2♥. Doing that empties the column. That’s only worth it because column 4 had a long run, from the K♦ down to the 3♦, sitting on two face-down cards. We moved the 3♥ up, then dragged the whole run into the space. That turned over a K♥.
If no King had been ready, the empty column would have done nothing for us, and the 3♥ would have been more use as a place to build.
Which King should go into a space?
The one that has a Queen of the opposite colour waiting for it.
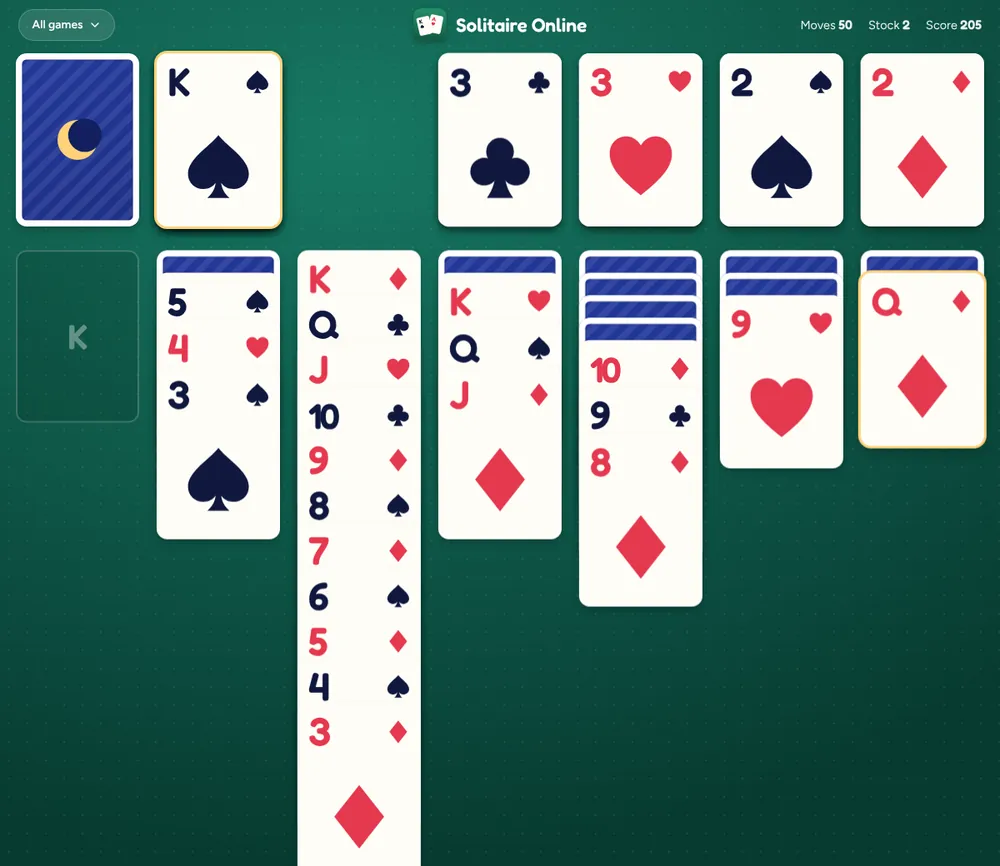
At move 51, column 1 was empty and two Kings could go there: the K♥ in column 4 and the K♠ on the waste. The Q♦ in column 7 was sitting on a face-down card and needed a black King. So the K♠ went in, the Q♦ followed it, and that turned over a 6♣.
The K♥ wasn’t wasted. A few moves later another column emptied, and it went there.
What if a card has two homes?
Choose the one that keeps columns with hidden cards light.
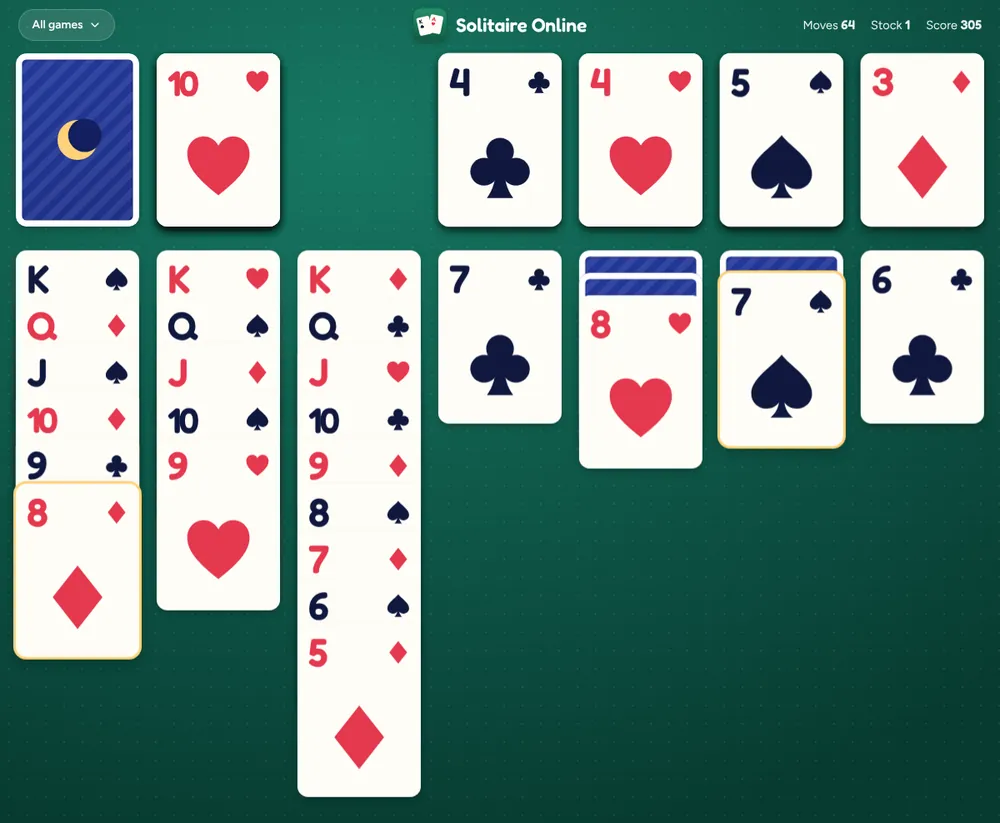
The 7♠ in column 6 could go on the 8♦ in column 1 or the 8♥ in column 5. Column 1 has nothing hidden underneath. Column 5 still has two face-down cards under its 8♥. Anything we stack on that 8♥ would have to come off again before we could reach those cards. So the 7♠ went on the 8♦, and that turned over a K♣.
Is it worth going through the stock again?
In Turn 1, yes, as long as something has changed since the last pass.
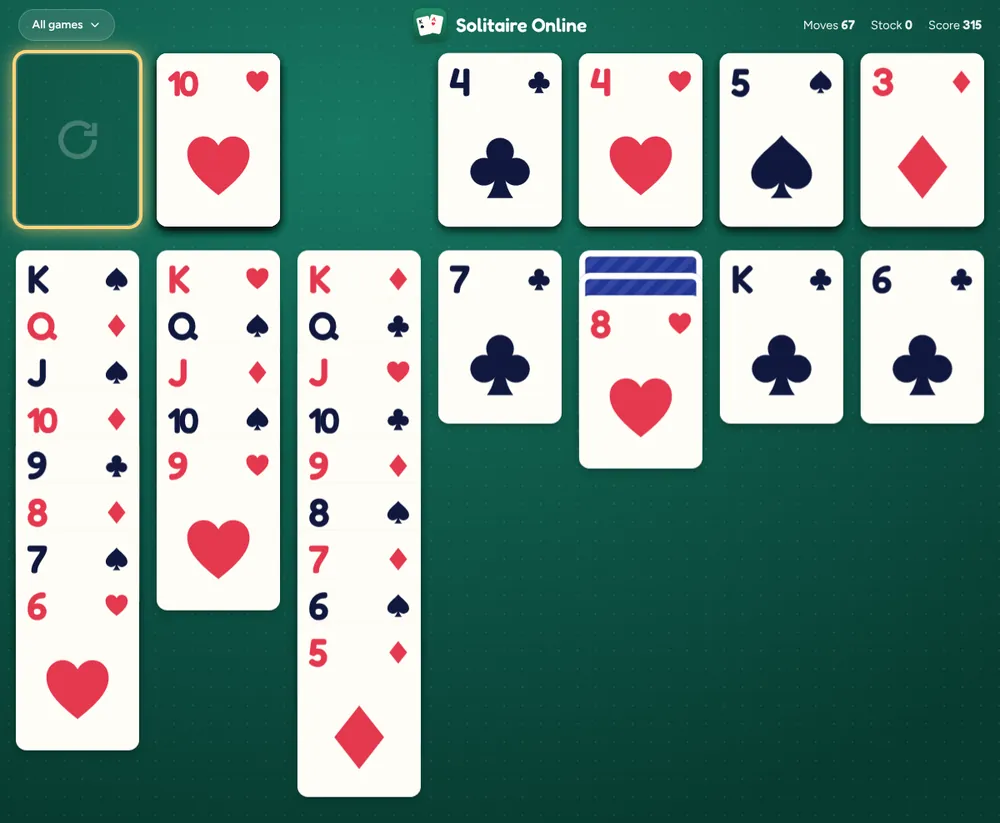
After the first pass, the stock was empty and the circular arrow appeared. Our columns now looked very different, so cards that had nowhere to go before might fit now. We tapped the arrow to turn the waste back over. It costs 100 points in Turn 1, but it’s the only way to reach those cards again.
On the second pass, the waste cards went to the foundations and columns. Then the 8♥ moved off column 5, uncovering the last two face-down cards.
How did the game end?
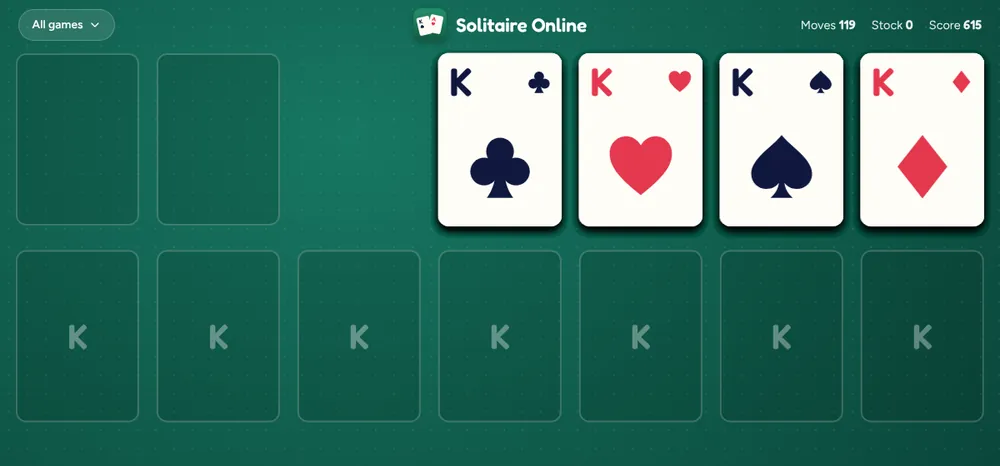
Once every card was face up and the stock was empty, the game finished itself. The counter stopped at 119 moves, including every card turned from the stock and the cards the game moved home at the end. The score was 615.
Not every deal goes this well. With perfect play and every card known, about 1 in 10 Turn 1 deals can’t be won at all, as our post on the odds of winning Solitaire explains. But habits like these are what turn a winnable deal into a win.
Which habits should you practise?
- Play Aces and 2s to the foundations as soon as they appear.
- Make moves that turn over face-down cards, deepest column first.
- Only turn the stock when the columns have nothing useful left.
- Keep 3s and up in the columns while other cards still need them.
- Only empty a column when a King is ready to fill it.
- Pick the King whose opposite-colour Queen is waiting.
- When a card has two homes, put it on the column with nothing hidden underneath.
For the basics of the table, see how to play solitaire. If you like a harder game, the same habits work in Klondike Turn 3.
Questions people ask
- Is Klondike Solitaire skill or luck?
- Both. Some deals cannot be won however well you play, but good habits win far more of the deals that can be.
- Does this strategy work in Turn 3?
- Yes. The same habits apply. Turn 3 adds one more: go through the stock once before you commit, because you can only play the top card of each group of three.
- Should I use Hint and Undo?
- Yes. Hint lights up a useful move when you are stuck, and Undo takes back as many moves as you like. Trying a line and undoing it is one of the best ways to learn.